Malware Analysis Homelab
This guide will serve as a lab for both static and dynamic malware analysis. The dynamic analysis portion will be in its own network that cannot reach out to the host network and vice versa.
I have to give credit to c3rb3ru5 because her guide is what taught me about being able to create networks within virtual machines and setting up mitmproxy to capture traffic.
It was inspired by her KVM Malware Lab Guide but I had to make some changes due to issues on my end. So, I chose to not use a Pfsense router (for now) and instead just use a NAT interface on the Ubuntu machine. I definitely recommend adding Pfsense though to further secure the lab.
Network Adapters
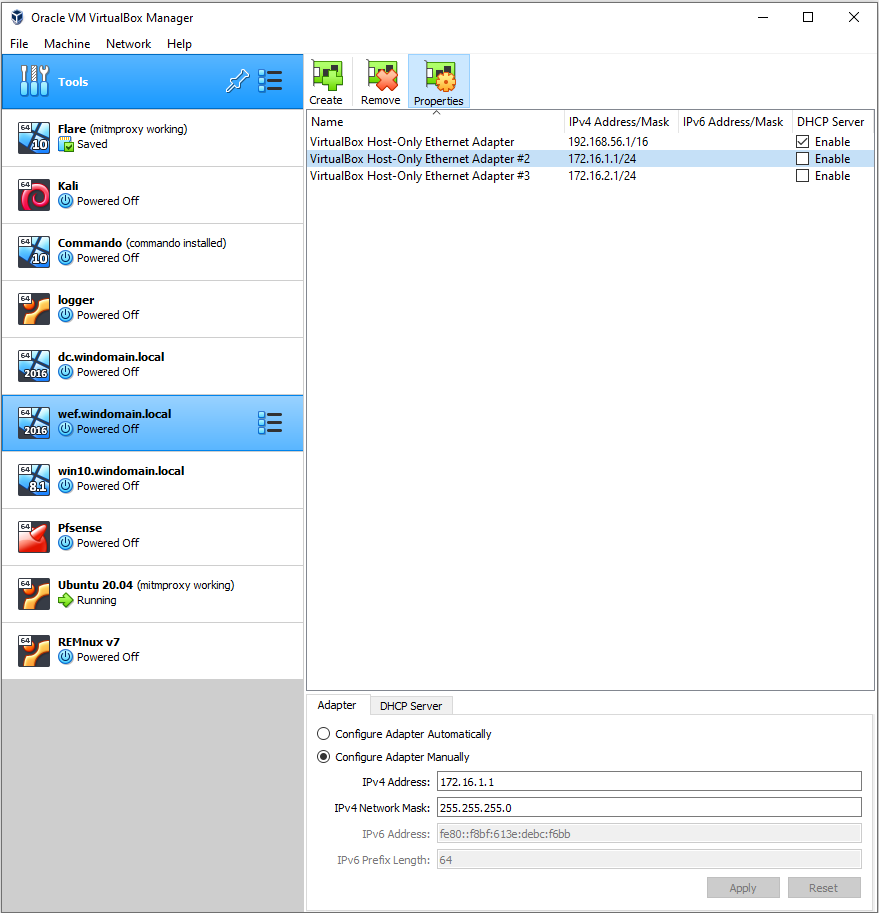
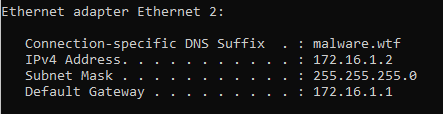
Within VirtualBox, click the three dots next to Tools and select Network. Create one network adapter, click “Configure Adapter Manually” and set it the IPv4 to 172.16.1.1 and the network mask to 255.255.255.0. Also, ensure the DHCP server is disabled. We’ll be creating a separate DHCP server later. Just focus on Adapter #2 in the picture below. If this is your first time creating a Host-Only adapter, yours will not have a number after it.
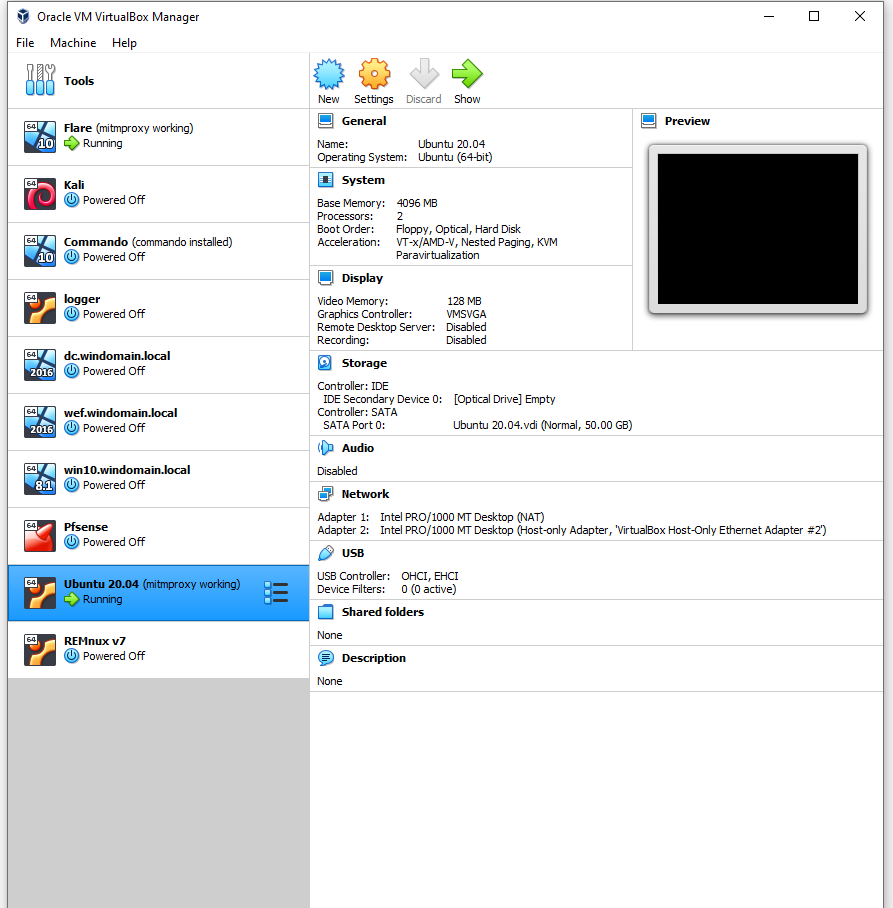
Ubuntu Desktop 20.04
This VM will be a gateway for the dynamic analysis network and also serve as the static analysis machine. Users can opt to replace this with Remnux but I prefer keeping my list of tools to a minimum, so I stuck with a fresh Ubuntu install and will install tools as I see fit. Also, I don’t believe it matters if you use 20.04 or 22.04 as the notable networking changes in Ubuntu happened after 18.04.
22.04: https://ubuntu.com/download/desktop
20.04: https://releases.ubuntu.com/20.04/
Create a VM with these settings:
- 4GB RAM
- 2 cores
- Adapter 1 set to NAT
- Adapter 2 set to your Host-Only adapter
Boot the VM, go through the Ubuntu configuration to install it, and once you’re at the desktop:
sudo apt update && sudo apt -y upgradesudo apt install isc-dhcp-server openvpn- Run
ip addrto get a list of ethernet connections. - Three should show up. One is a loopback, one is the NAT adapter, the last is your host-only adapter. To tell the last two apart, your NAT adapter should have an address of
10.0.2.15as this is what connects to the internet.
Now it’s time to configure the analysis network (host-only adapter) to set a static IP.
sudo nano /etc/netplan/01-network-manager-all.yaml
Your file should look like the one below. Remember, replace enp0s8 with whatever your host-only adapter was listed as in the previous section.
Here we’re setting the adapter’s static address, noting its subnet mask, setting the gateway, and configuring a DNS nameserver. As this is a YAML file, indentation is important. Use spaces over tabs. No, I will not argue that decision ;)
# Let NetworkManager manage all devices on this system
network:
  version: 2
  renderer: NetworkManager
  ethernets:
    enp0s8:
      addresses:
        - 172.16.1.1/24
      gateway4: 172.16.1.1
      nameservers:
          addresses:
          - 172.16.1.1
sudo netplan apply to set the settings.
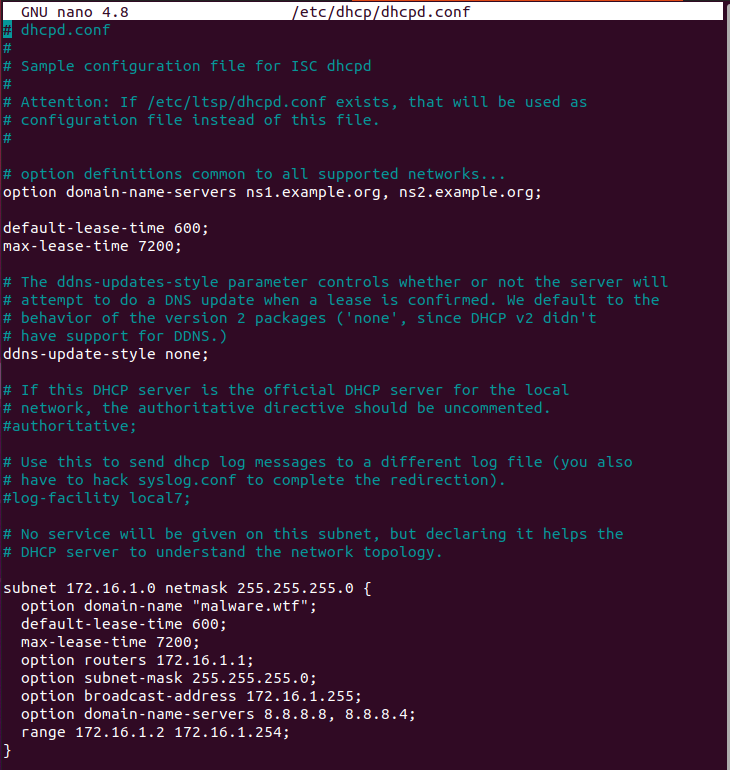
The next step sets up the DHCP server for the dynamic analysis network. The only thing to add is a few lines defining the network. Make sure your files look like the two below. option domain-name can be whatever. Yes, I noticed lease-time values are duplicated. Comment out the first section if you want but it won’t cause errors either way. “If it’s not broken, don’t fix it.”
sudo nano /etc/default/isc-dhcp-server
- Set INTERFACESv4 to your host-only adapter

sudo nano /etc/dhcp/dhcpd.conf
Save this file then run the below commands. Enable starts the service on next boot; However, it does not start the service right now, so the next command just restarts it with the new settings. Lastly, check the status and if it’s running. If so, you now have a DHCP server within Ubuntu.
sudo systemctl enable isc-dhcp-server
sudo systemctl restart isc-dhcp-server
sudo systemctl status isc-dhcp-server
Time to forward traffic. The first line adds a NAT forwarding rule to iptables and uses the NAT adapter. Make sure the adapter reflects your NAT adapter, NOT the host-only adapter. If you make a mistake here, run iptables --flush to delete the rule and start over.
sudo iptables -t nat -A POSTROUTING -o enp0s3 -j MASQUERADE
Optional: To hide your public IP, route through tun0 instead of enp0s3 and use openvpn. A great guide for doing that is here:
https://c3rb3ru5d3d53c.github.io/documents/kvm-malware-lab/#create-remnux-vm-ubuntu-2204
sudo nano /etc/sysctl.conf
- Uncomment the line with
net.ipv4.ip_forward=1
sudo sysctl -w net.ipv4.ip_forward=1
Lastly, install iptables-persistent and select yes for both prompts.
sudo apt install iptables-persistent
Alright, so that was a lot. To summarize so far:
- Ubuntu is our gateway and static analysis machine. The NAT adapter gets an internet connection, iptables rule is set to forward outgoing traffic to that interface, and the host-only adapter has a static IP configured.
- The host-only adapter is used to create a DHCP network for a dynamic analysis machine. This separate network will run through a proxy where we can intercept traffic.
Finally, setup MITMProxy. This tool will intercept all traffic on the dynamic analysis machine and even decrypt TLS traffic.
sudo apt update
sudo apt install -y wireshark tshark # Say yes to non-super user packet capture
sudo usermod -a -G wireshark $USER   # logout then login again
wget https://snapshots.mitmproxy.org/8.1.0/mitmproxy-8.1.0-linux.tar.gz
tar -xzvf mitmproxy-8.1.0-linux.tar.gz
sudo mv mitmdump /usr/bin/
sudo mv mitmproxy /usr/bin/
sudo mv mitmweb /usr/bin/
wget https://gist.githubusercontent.com/c3rb3ru5d3d53c/d9eb9d752882fcc630d338a6b2461777/raw/f56cbef4b98c7bad8f265534eabf696923b649a2/mitmpcap
chmod +x mitmpcap
sudo mv mitmpcap /usr/bin/
wget https://gist.githubusercontent.com/c3rb3ru5d3d53c/3bc8041a182467ccae0207394c1e16b3/raw/33bf201da721ae8f8dc057480221a3c6612e7c11/mitmhttp
chmod +x mitmhttp
sudo mv mitmhttp /usr/bin/
sudo mkdir /root/.mitmproxy
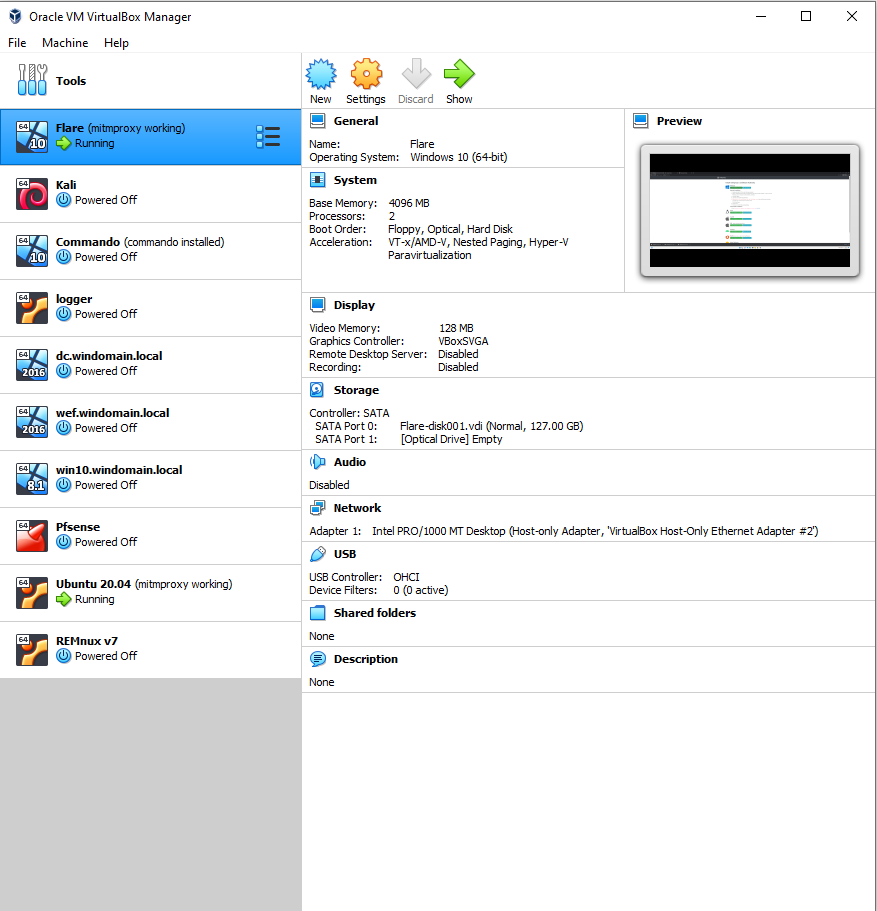
Windows 10
Don’t worry, this one is simple.
Create a Windows 10 VM and assign it the host-only adapter you created. Do not add a NAT adapter.
As long as isc-dhcp-server is running (run sudo systemctl status isc-dhcp-server to check), the Windows machine should get assigned an IP thanks to the Ubuntu DHCP server. Just open a command prompt, type ipconfig and your system should be within the new network.
On the Ubuntu machine, start mitmproxy. I’d recommend making a shell script so you don’t have to remember the commands.
sudo mitmhttp -i enp0s8 --enablemitmproxy --mode transparent --listen-host 0.0.0.0 --listen-port 8080
On Windows, open a browser and navigate to mitm.it
- Download the P12 file and click it to start the import wizard.
- I chose local system as the store location.
- Click next, next, no password.
- For placing certificates, browse and select Trusted Root Certification Authorities.
- Finish
Then browse to https://example.com to verify a successful decryption.
Back on your Ubuntu machine, you should see all the traffic coming through. Check the packet for the domain above to view the decrypted traffic.
Now for the best part. Similar to above, this command captures live traffic, but with the added bonus of dumping a PCAP and storing TLS secrets. Stop the above mitmproxy command and replace with this one.
mitmpcap -i enp0s8 -w dump.pcap -m transparent -p 8080 -s secrets.txt -v 1 -f libpcap
Now browse some sites, execute malware, whatever you want. Once you’re done capturing, exit mitmproxy. In the directory you ran the above command, you should see dump.pcap and secrets.txt.
Open Wireshark, go to Edit → Preferences → Protocols → Scroll down to TLS → (Pre)-Master-Secret log filename → Browse → add secrets.txt.
Then add a Wireshark filter for HTTP and you should see decrypted traffic. A fun test is log into a site (fake credentials) and view the packet through mitmproxy or Wireshark to see the credentials in plaintext.
A customization I make on every fresh Wireshark install is found here: https://unit42.paloaltonetworks.com/unit42-customizing-wireshark-changing-column-display/
Not required but it helps me focus on the more important aspects of packets.
Malware Time
For a practical test, I used a recent maldoc sample that targeted Ukrainian entities.
Leaked_Kremlin_emails_show_Minsk_protoco.doc
This analysis just highlights the basics of capturing and viewing decrypted traffic. I wrote a separate post that analyzes the sample a bit further.
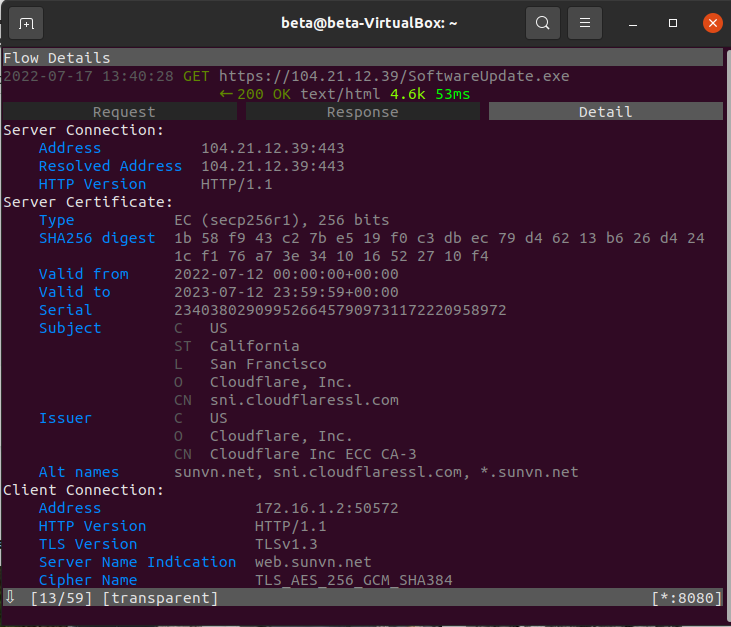
Within mitmproxy, the first request is a GET request for SoftwareUpdater.exe. Ignore the POST requests above as that was for something else.
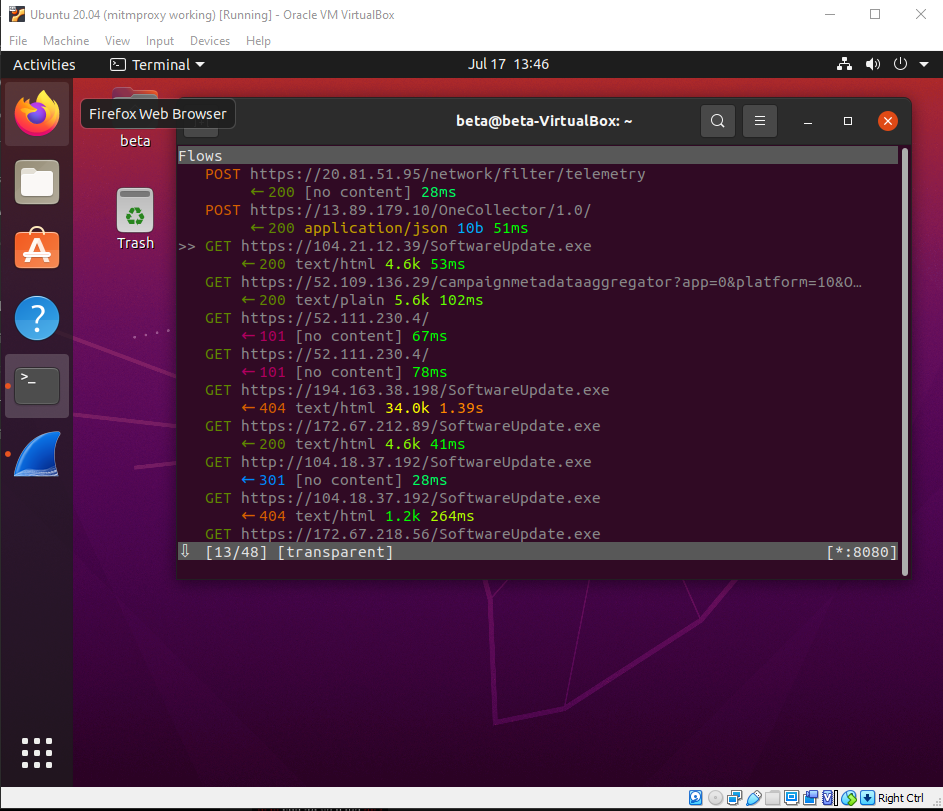
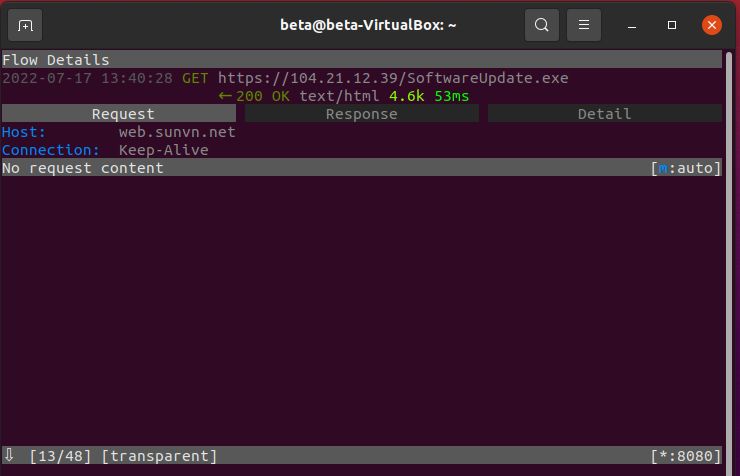
To select this packet, make sure the >> is next to it and press enter. Now you can view the request/response and details of the packet.
So the request resolves the IP to web[.]sunvn[.]net.
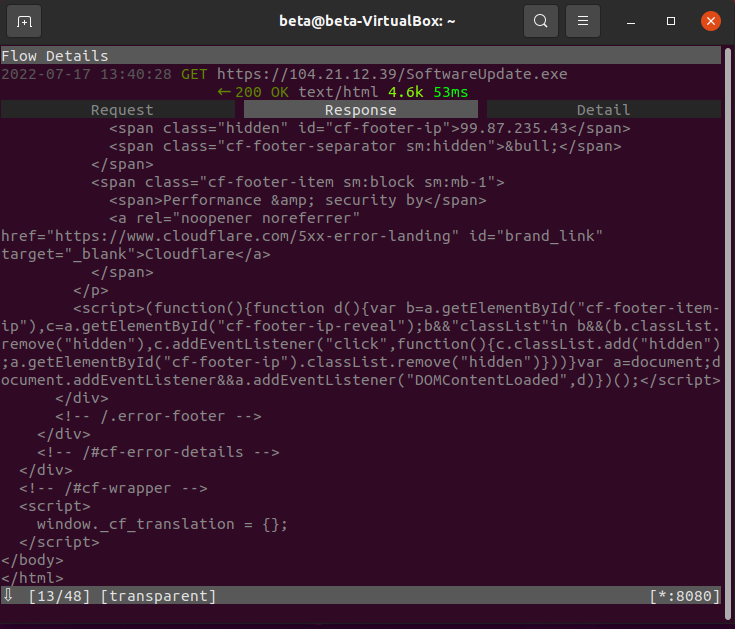
I’ll skip some details of the response and go to the actual HTML where some scripts are included.
Lastly, the detail tab gives a lot of information about the server certificate. The important information is already presented, but you could copy the serial and search on Censys to explore further.
There’s so much more to mitmproxy including mitmweb if you prefer a web interface over CLI. I’ve only shown the basics, but it has proven to be a great tool for monitoring malicious traffic. If you look at the packet list above, you’ll see more GET requests grabbing the same file, but from different IPs. That’s a lot of IOCs already.
Conclusion
When you have networking issues, blame DNS. It’s always DNS. Hopefully this guide works for you as well, but as mentioned before, definitely check out the guide that inspired me to take on this challenge. If everything was successful, you now have a machine for static analysis with internet access that you can route through openvpn and a machine sitting in a separate subnet for dynamic analysis.
Now a task for you. Get creative! Add your own tools to each machine to help in analysis. For my dynamic analysis machine, I used FlareVM since it was already created. Another option is to use a fresh Windows VM and install SentinelLabs RevCore Tools.
Lastly, take snapshots. Lots of them. It’s a long process setting this lab up and if something breaks, you definitely want a recent point to revert back to.